Exit-intent popups are a tried-and-tested way to re-engage users before they leave your site. In this guide, we’ll explore two approaches to adding an exit-intent popup to your WordPress site: a solution using pure JavaScript, offering a lean, customizable approach ideal for developers who prefer hands-on solutions, as well as a no-code option using a WordPress popup plugin.
Whether you want to customize every detail or use a plugin to save time, this guide will help you implement an effective exit-intent popup that works across all devices.
Creating an Exit-Intent Popup with JavaScript
Let’s start by looking at a simple JavaScript implementation of an exit-intent popup. This method involves making changes to your WordPress theme files. While it’s a good way to learn, it has limitations, especially for mobile users and advanced marketing needs.
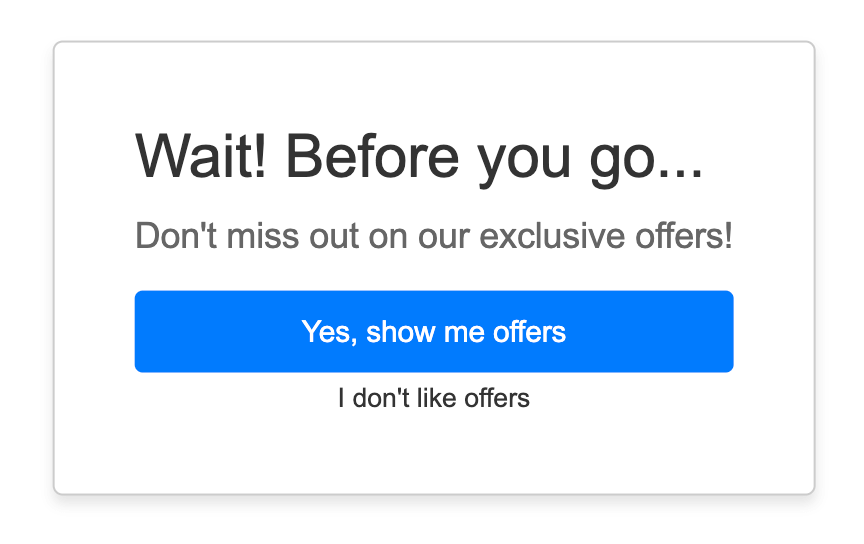
The exit-intent popup we’ll be creating is seen below:

Let’s get started, follow the steps listed below:
Step 1: Create the Popup HTML
First, you’ll need to create the HTML structure for your popup. You can add this to your theme’s footer.php file or use a plugin that allows you to add custom HTML to your site.
<div id="exit-popup">
	<h2>Wait! Before you go...</h2>
	<p>Don't miss out on our exclusive offers!</p>
	<div class="exit-popup-actions">
		<a href="#" class="view-offers">Yes, show me offers</a>
		<button onclick="closePopup()" class="leave-offer">I don't like offers</button>
	</div>
</div>
Step 2: Add JavaScript and CSS to Your WordPress Theme
In this step, we’ll add both the JavaScript and CSS files to your WordPress theme:
- Open your WordPress theme’s functions.php file. You can do this by going to Appearance > Theme Editor in your WordPress dashboard.
- Add the following code at the end of the file:
function add_exit_intent_assets() {
    wp_enqueue_script('exit-intent-script', get_template_directory_uri() . '/assets/js/exit-intent.js', array(), '1.0', true);
    wp_enqueue_style('exit-intent-style', get_template_directory_uri() . '/assets/css/exit-intent.css', array(), '1.0');
}
add_action('wp_enqueue_scripts', 'add_exit_intent_assets');
This function tells WordPress to load both a new JavaScript file named exit-intent.js and a new CSS file named exit-intent.css.
- Create a new file named exit-intent.js in your theme’s /assets/js/ directory. If the directory doesn’t exist, create it.
- Add the following JavaScript code to exit-intent.js:
document.addEventListener('DOMContentLoaded', function() {
    let popupShown = false;

    document.addEventListener('mouseleave', function(e) {
        if (e.clientY < 0 && !popupShown) {
            showPopup();
        }
    });

    function showPopup() {
        document.getElementById('exit-popup').style.display = 'block';
        popupShown = true;
    }

    window.closePopup = function() {
        document.getElementById('exit-popup').style.display = 'none';
    }
});- Create a new file named exit-intent.css in your theme’s /css/ directory. If the directory doesn’t exist, create it.
- Add the following CSS code to exit-intent.css:
#exit-popup {
    display: none;
    position: fixed;
    top: 50%;
    left: 50%;
    transform: translate(-50%, -50%);
    background-color: #fff;
    padding: 40px;
    border: 1px solid #ccc;
    z-index: 9999;
    max-width: 400px;
    border-radius: 5px;
    box-shadow: 0 4px 6px rgba(0, 0, 0, 0.1);
    font-family: Arial, sans-serif;
}

#exit-popup h2 {
    font-size: 30px;
    color: #333;
    margin: 0 0 10px 0;
}

#exit-popup p {
    font-size: 18px;
    color: #666;
    margin: 0 0 15px 0;
}

#exit-popup .exit-popup-actions {
    display: flex;
    flex-direction: column;
    gap: 5px;
}

#exit-popup .view-offers {
    background-color: #007bff;
    color: white;
    border: none;
    font-size: 15px;
    text-decoration: none;
    text-align: center;
    padding: 10px 20px;
    border-radius: 4px;
    cursor: pointer;
}

#exit-popup .view-offers:hover {
    background-color: #0056b3;
}

#exit-popup button.leave-offer {
    background: transparent;
    color: #333;
    padding: 0;
    border: none;
    cursor: pointer;
}
However, this method has significant limitations for businesses focused on maximizing sales and lead generation:
- Lack of mobile support: This approach will only work on desktop devices, potentially missing out on a huge segment of your audience such as mobile users.
- Limited targeting options: You can’t easily segment visitors or create personalized offers based on browsing behavior.
- Basic design capabilities: Creating visually appealing popups that match your brand may require additional CSS and design skills.
- No A/B testing: Testing different offers or designs to optimize conversion rates is challenging with a basic JavaScript implementation.
- Limited analytics: Tracking popup performance and conversion rates requires additional coding.
Given these limitations, especially for businesses serious about growth, many e-commerce owners and marketers turn to more robust solutions.
Creating an Exit-Intent Popup with a WordPress Popup Plugin
While the JavaScript method provides a hands-on approach, using a WordPress popup plugin like FireBox is a more robust and user-friendly solution. FireBox offers advanced features and flexibility to create highly effective exit-intent popups without coding.
Creating an exit-intent popup with FireBox is easy. You start by selecting a template, customizing your content, setting triggering rules, and enabling your popup. To help you learn how to use FireBox to create exit-intent popups, we’ve prepared a detailed guide covering everything you need to know.

To learn more, check out our detailed guide: How to Create an Exit-Intent Popup in WordPress.
In that tutorial, you’ll find:
- The science behind exit-intent popups and why they’re so effective
- How do exit intent popups compare to immediate popups in terms of user experience and conversion rates
- How mobile exit intent is a valuable asset in engaging and retaining your visitors
- Strategies for addressing common consumer concerns about popups
- Powerful trigger words and phrases to boost your popup’s effectiveness
- A step-by-step walkthrough of creating an exit-intent popup in WordPress using FireBox
- Advanced techniques to go beyond basic exit-intent triggers
- The best tactics to double your conversions with exit intent popups
- Answers to frequently asked questions about exit-intent popups
Ready to take your popups to the next level? Dive into the guide to create your high-converting exit-intent popup today!
Exit Intent WordPress Popups Boost conversions with high-performing exit-intent popups for your WordPress site.Conclusion
Exit-intent popups are a powerful tool for driving more sales and building your email subscriber list on your WordPress site. The FireBox plugin makes it easy to create high-converting exit-intent popups that engage visitors just before they leave your site. FireBox’s easy-to-use campaign builder, advanced targeting options, and in-depth analytics empower you to design popups that capture the attention of your audience at the perfect moment.
By displaying compelling offers or content, you can convince visitors to convert, whether purchasing, signing up for your email list, or taking another valuable action. Don’t let visitors slip away without giving them one last chance to engage with your business. Implement effective exit-intent popups with FireBox and watch your sales and email list grow.
Get FireBox for Free
Enter your WordPress website URL to install instantly.
Trusted by 9,000+ users


0 Comments