Using the Date/Time Field
The FireBox Date/Time field lets you add a date time picker in your forms. Whether you’re creating a registration form, booking form, event registration form, or any WordPress form that requires you to receive a formatted date, this field is for you.
TABLE OF CONTENTS
- What you need to know before you start
- How to Add a Date/Time Field to Your WordPress Forms
- Date/Time Field Settings
What you need to know before you start
Before you can begin this tutorial, you must install FireBox Pro by following the steps listed below:
Step 1: Download FireBox Pro
The very first step is to get a license for FireBox Pro. Then, after purchasing FireBox Pro, you can access the Pro version.
- Go to fireplugins.com/downloads/
- Login with the details you received in the email after the purchase.
- Click Download in the Pro Downloads section.
Step 2: Install FireBox Pro
After downloading the FireBox Pro installation zip file, upload it to your site.
- Head to your WordPress dashboard and click on Plugins > Add New.
- Choose the zip file you have just downloaded. Click on install.
- Once the plugin is installed, click the Activate Plugin button to activate the plugin on your site.
Step 3: Activate FireBox Pro
After installing FireBox Pro, you must activate your license to ensure you receive automatic updates from the plugin. To learn more about creating and managing your license keys, click here.
If you need any help with the installation process, see the documentation on installing FireBox Pro for help. If you’re already using FireBox Lite, you can easily upgrade from Lite to Pro. However, after upgrading to Pro, you must also activate your license to ensure you receive automatic plugin updates.
How to Add a Date/Time Field to Your WordPress Forms
Once you’ve installed FireBox Pro, you can follow the steps listed below to add a Date/Time field to your Form.
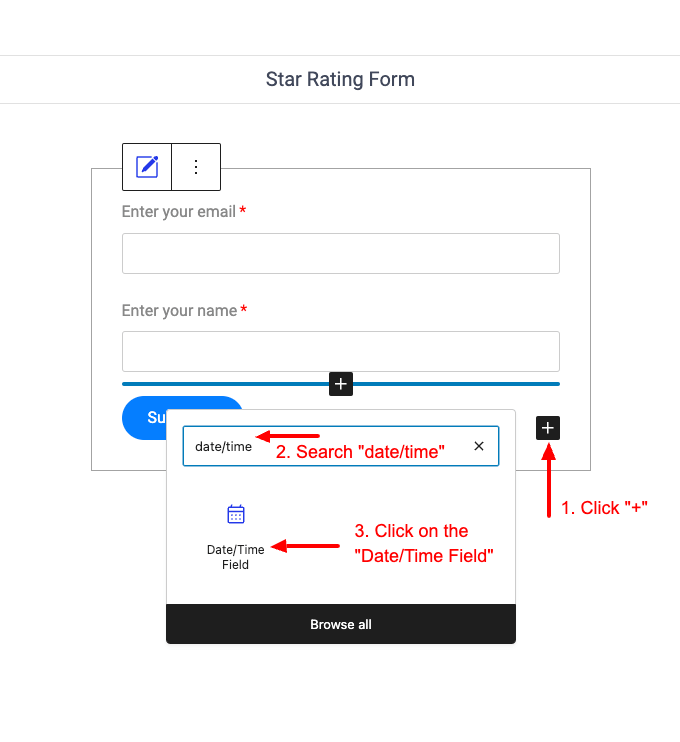
Step 1: Select your FireBox Form block and click on the “+” icon to insert a new block. Search for “Date/Time” and click on it to add it to your form.

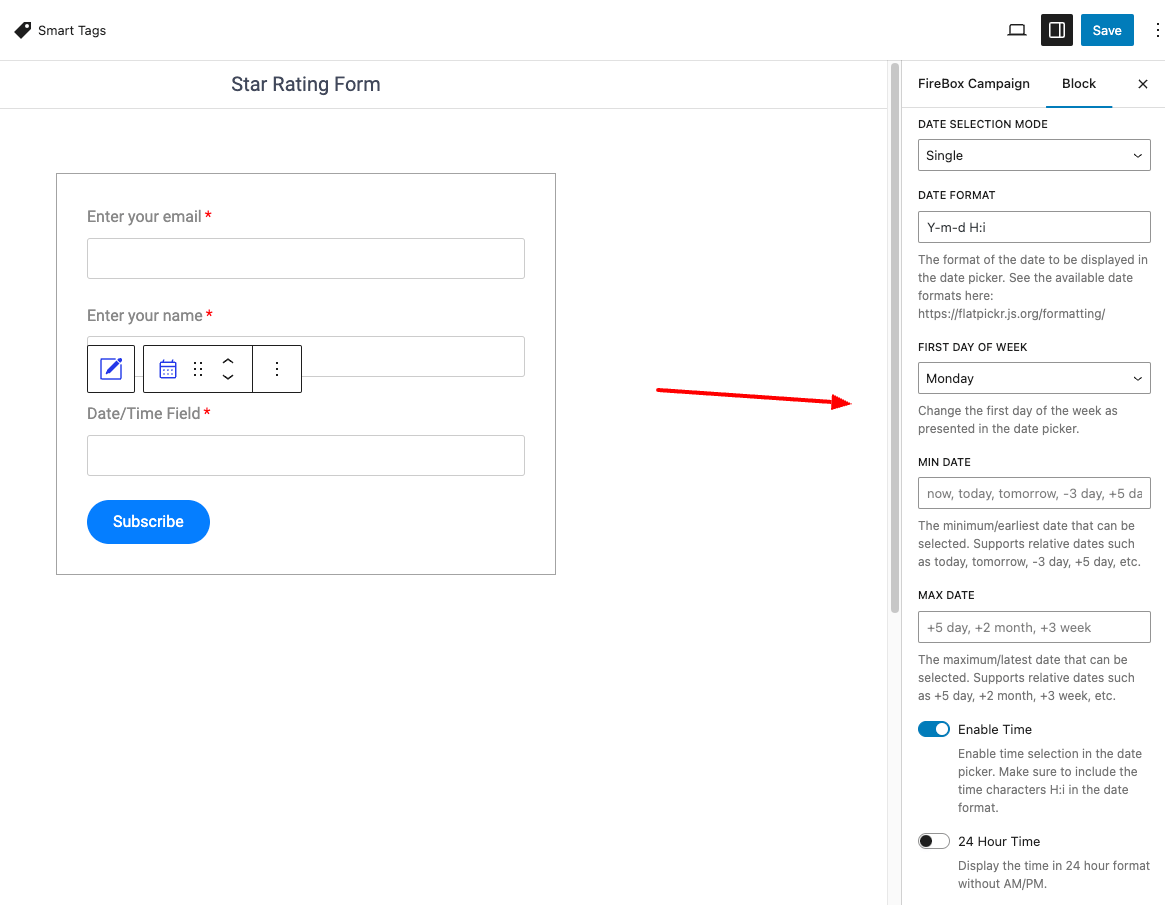
Step 2: Customize the Date/Time field by specifying the date selection mode, date format, first day of the week, min/max date, enable time, set 12/24 hour time, minute step, and more.

Below, you can find all the settings available in the Date/Time field.
Date/Time Field Settings
Date Selection Mode
Select whether to allow visitors to select a single date, multiple dates, or a date range.
Date Format
Specify the date format that will be visible on the Date/Time picker. See the available date formats here: https://flatpickr.js.org/formatting/
First day of the week
Specify which will be the first date of the week, within the Date/Time picker.
Min Date
Specify the minimum/earliest date that can be selected by the user in the Date/Time picker. Supports relative dates such as today, tomorrow, -3 day, +5 day, etc.
Max Date
Specify the maximum/latest date that can be selected by the user in the Date/Time picker. Supports relative dates such as today, tomorrow, -3 day, +5 day, etc.
Enable Time
Set whether the user can select time in the Date/Time picker. Make sure to include the time characters H:i in the date format.
24 Hour Time
Set whether to display the time in 24-hour format without AM/PM.
Minute Step
Set the interval between available minutes in the date picker. For example, if set to 15, the minutes shown will be 00, 15, 30, 45.
Display Inline
Enable to display the Date/Time picker inline with the form fields, and not in a modal.
Disable Mobile Native Picker
Enable to retain the FireBox Date/Time picker on mobile devices.


