How to install FireBox
The following guide will help you install our WordPress popup plugin, FireBox on your site.
System Requirements
Our main goal is to create the fastest and most advanced popup plugin for WordPress. To achieve this, we make sure it's based on the latest technology available. Before proceeding with the installation of our popup plugin make sure you meet the System Requirements.
Installing FireBox
The best way to install a WordPress plugin is through the plugin search in your dashboard. As FireBox is available on the WordPress plugin directory, you are able to do so.
First thing you need to visit the Plugins > Add New page inside your WordPress admin area.
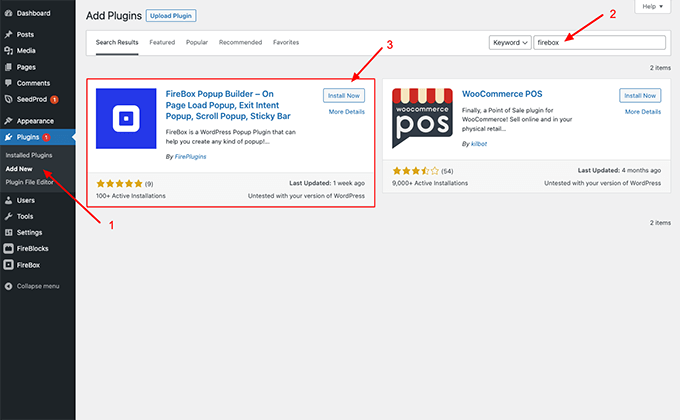
You will see a screen like the one in the screenshot above. In the search box at the top right corner, type "FireBox" and hit enter. After that, you will see the plugin in the results. Click "Install Now" button next to the FireBox plugin.
In the next few seconds, WordPress will download and install the plugin for you. The 'Install Now' button will change into an 'Activate' button after this.
WordPress plugins can be installed on your site, but they won't work until they are activated. To use the plugin on your WordPress site, simply click the activate button.
All done, the FireBox popup plugin is now installed successfully!
Installing FireBox Pro
Congratulations on signing up for FireBox Pro. This guide walks you through the entire process of installing and activating FireBox Pro on your WordPress site so you can start benefiting from the extra features it includes.
Note: If you're currently using FireBox Lite and you would like to upgrade to FireBox Pro read our How to Upgrade from Lite to Pro guide.
Download FireBox Pro
After purchasing FireBox Pro you can access the Pro version.
- Go to fireplugins.com/downloads/
- Login with the details you received in the email after the purchase.
- Click Download in the Pro Downloads section.
Upload FireBox Pro to your WordPress site
After downloading the FireBox Pro installation zip file you will need to upload it to your site.
- Head over to your site’s WordPress dashboard, and click on Plugins > Add New.
- Choose the zip file you have just downloaded. Click on install.
- Once the plugin is installed, click on the Activate Plugin button to activate the plugin on your site
Activate FireBox Pro
After installing FireBox Pro, you need to activate your license to ensure you receive plugin automatic updates. To learn more details about how to create and manage your license keys, click here.